Introduction
This is a guide for `SvelteKit 1.0` with Authentication using AuthJS (also known as NextAuth). But it's going to be much more than a guide to SvelteKit. Here, I'm going to explain how to add TailwindCSS with DaisyUI, Github OAuth using AuthJS, Theme Switcher from DaisyUI Docs and all SvelteKit basics.
Resources
What is SvelteKit?
In simple words we can say, SvelteKit is a framework for building web applications with the Svelte front-end JavaScript library. But it comes with much more than anyone can think of and it's all thanks to
`Rich Harris`,
Svelte and SvelteKit Team because of them we are seeing SvelteKit v1. Coming back to topic, SvelteKit
offers multiple thinks out of the box like:
- Form Actions: You can submit form to server without full page reload.
- Nested Layout: A shared UI between routes without affecting the main URL.
- Universal Loader: Universal load functions that run both on the server and in the browser.
- Adapters: Adapters makes it easy to deploy your app on any place Node Server, Vercel, Cloudflare and etc.
- Data Type Safety: Provides to pre-configured Typescript support and it's way much better if you how to utilize it.
- Packaging: This enables us to make component libraries easily for svelte and kit.
- Link Options: We got prefetching, data reload which `a` tag.
- SSR: Customisable server side rendering for every route.
Creating New SvelteKit Project
Before you start, Make sure have installed Node v16
or greater. You can use npm/yarn/pnpm as
package manager it's all upto you.
- Open your terminal and change directory to where you wanna create your new project.
- After changing to your working directory:
When you create SvelteKit project you will get some option choose them according your need.
Bash
Creating new SvelteKit projectpnpm create svelte@latest myApp // To create new sveltekit projectcreating...Done!cd myApp && pnpm i // To install all dependencies- After creating project, Your project directory will going to look like:
				├── package-lock.json
				├── package.json
				├── playwright.config.ts
				├── pnpm-lock.yaml
				├── src
				│   ├── app.d.ts
				│   ├── app.html
				│   └── routes
				│       └── +page.ts
				├── static
				│   └── favicon.png
				├── svelte.config.js
pnpm dev // For pnpmnpm run dev // For npmThis completes the part how we create new sveltekit project. I'll be explaining some more things about sveltekit after setting up basic needs for app.
Adding TailwindCSS and daisyUI for Design
- Now we are going to add Tailwind CSS and DaisyUI to our project, so first open your terminal and make sure you are in root directory of project.
- Install TailwindCSS and DaisyUI using package manager and then initiate the tailwind config like:
Adding TailwindCSS and DaisyUI to SvelteKitpnpm install -D tailwindcss postcss autoprefixer daisyuiinstalling...Done!Initiating tailwind.config.cjspnpx tailwindcss init tailwind.config.cjs -p- Now, we have initiated
tailwind.config.cjswe have to changecontentobject according to svelte files. - For DaisyUI, we need to add it as
pluginintailwind.config.cjs.
tailwind.config.cjs
module.exports = {content: ['./src/**/*.{html,js,svelte,ts}'], theme: { extend: {} }, plugins: [require('daisyui')]};- After setting up tailwind config we have to add a
app.cssfile insrcdirectory of your project and then add following lines of code in that file.
app.css
Add `app.css` file in `src` directory@tailwind base;@tailwind components;@tailwind utilities;- After adding
app.css,add+layout.sveltefile insrc/routesdirectory. - Add following lines of code:
Add +layout.svelte` file in `src/routes` directory<script> import "../app.css";</script><slot />- After adding TailwindCSS in project, Your project directory will going to look like:
				├── package.json
				├── playwright.config.ts
				├── pnpm-lock.yaml
				├── postcss.config.cjs
				├── src
				│   ├── app.css
				│   ├── app.d.ts
				│   ├── app.html
				│   └── routes
				│       ├── +layout.server.ts
				│       ├── +layout.svelte
				│       ├── +page.svelte
				│       └── +page.ts
				├── static
				│   └── favicon.png
				├── svelte.config.js
				├── tailwind.config.cjs
				├── tests
				│   └── test.ts
				├── tsconfig.json
				└── vite.config.js
This completes the part how we add TailwindCSS with daisyUI in project.
SvelteKit Routing
- SvelteKit uses filesystem-based router which are defined by directories in your
src/routes. - Examples:
src/routesis root directory of routes which is/on your app.src/routes/aboutas you can seeaboutis a directory so it's a route for app which is accessible as/abouton your app.src/routes/student/[slug]creates a routes which is dynamic in nature on the basis ofslugso if you want to access something like/student/1here1is slug's value which is accessible inside your route files.- Each route directory contains one or more route files, which can be identified by their
+prefix. - File Names:
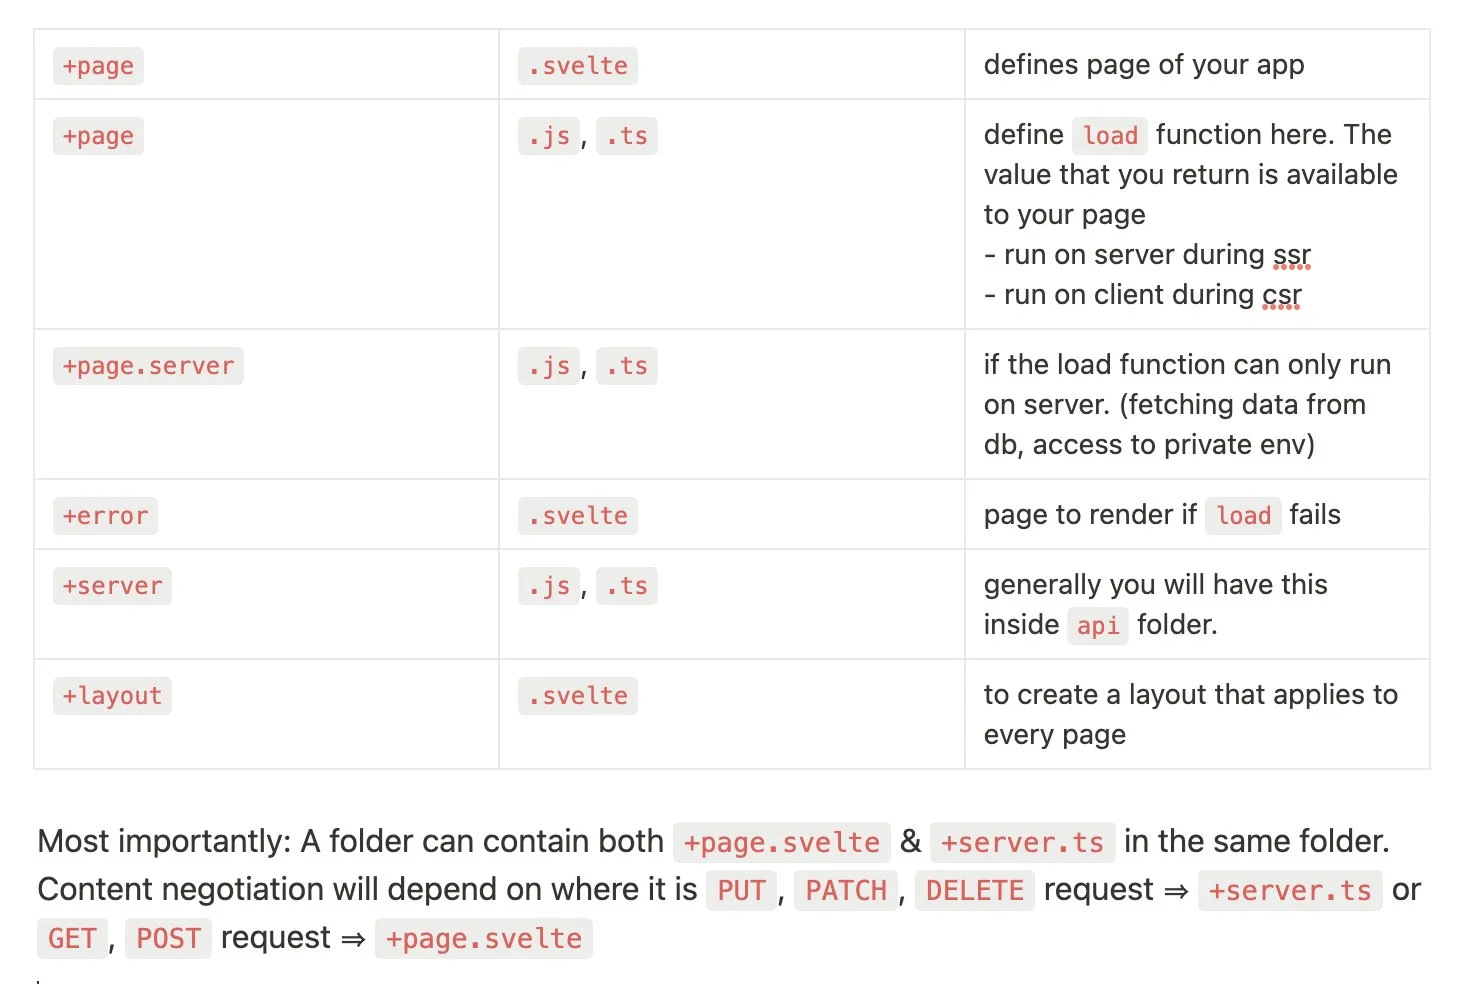
+layout.svelte, +layout.ts/layout.js, +layout.server.ts/+layout.server.js+page.svelte, +page.ts/+page.js, +page.server.ts/+page.server.js+server.ts/+server.js+error.svelte- You can change routes root directory in
svelte.config.tsand you can look here for config details +prefixed files explanation:+page.svelte,In this file we write our HTML, CSS and JS for your frontend view.+page.js/+page.ts and +layout.js/+layout.ts,In thesse file we write our load function which is a universal load which runs on both server as well as in browser.
